Tolerances to EN 10029 for Hot Rolled Plate
This standard covers a wider group of steel than stainless steel:
Non-alloy and alloy steel including stainless steel with:
- Nominal thickness > 3mm < 250mm
- Nominal width > 600mm
- Specified minimum yield strength < 700 N/mm2
Tolerances on plate less than 600 mm wide shall be agreed at time of enquiry/order
Thickness tolerance
At the enquiry/order stage it is necessary to define which of 4 classes A-D is required.
| Nominal thickness |
Tolerances on nominal thickness 1) |
| Class A |
Class B |
Class C |
Class D |
| Lower |
Upper |
Lower |
Upper |
Lower |
Upper |
Lower |
Upper |
| > 3 < 5 |
-0.4 |
+0.8 |
-0.3 |
+0.9 |
-0 |
+1.2 |
-0.6 |
+0.6 |
| > 5 < 8 |
-0.4 |
+1.1 |
-0.3 |
+1.2 |
-0 |
+1.5 |
-0.75 |
+0.75 |
| > 8 < 15 |
-0.5 |
+1.2 |
-0.3 |
+1.4 |
-0 |
+1.7 |
-0.85 |
+0.85 |
| > 15 < 25 |
-0.6 |
+1.3 |
-0.3 |
+1.6 |
-0 |
+1.9 |
-0.95 |
+0.95 |
| > 25 < 40 |
-0.8 |
+1.4 |
-0.3 |
+1.9 |
-0 |
+2.2 |
-1.1 |
+1.1 |
| > 40 < 80 |
-1.0 |
+1.8 |
-0.3 |
+2.5 |
-0 |
+2.8 |
-1.4 |
+1.4 |
| > 80 < 150 |
-1.0 |
+2.2 |
-0.3 |
+2.9 |
-0 |
+3.2 |
-1.6 |
+1.6 |
| > 150 < 250 |
-1.2 |
+2.4 |
-0.3 |
+3.3 |
-0 |
+3.6 |
-1.8 |
+1.8 |
- These thickness tolerances apply outside ground areas
| Nominal thickness |
Maximum thickness difference within a plate |
| Nominal width |
| > 600 < 2000 |
> 2000 < 2500 |
> 2500 < 3000 |
> 3000 < 3500 |
> 3500 < 4000 |
> 4000 |
| > 3 < 5 |
0.8 |
0.9 |
0.9 |
--- |
--- |
--- |
| > 5 < 8 |
0.9 |
0.9 |
1.0 |
1.0 |
--- |
--- |
| > 8 < 15 |
0.9 |
1.0 |
1.0 |
1.1 |
1.1 |
1.2 |
| > 15 < 25 |
1.0 |
1.1 |
1.2 |
1.2 |
1.3 |
1.4 |
| > 25 < 40 |
1.1 |
1.2 |
1.2 |
1.3 |
1.3 |
1.4 |
| > 40 < 80 |
1.2 |
1.3 |
1.4 |
1.4 |
1.5 |
1.6 |
| > 80 < 150 |
1.3 |
1.4 |
1.5 |
1.5 |
1.6 |
1.7 |
| > 150 < 250 |
1.4 |
1.5 |
1.6 |
1.6 |
1.7 |
--- |
Thickness shall be measured at any point situated more than 25mm from the transverse or longitudinal edges of the plate, other than locally ground areas.
For plates with untrimmed edges the measuring points shall be agreed at the time of order.
Ground areas
The standard governing surface defects and permissible ground areas of hot rolled plates is EN 10163. It is intended to publish an article on this standard on the website in the near future.
Width tolerance
| Nominal width |
Tolerances |
| Lower |
Upper |
| > 600 < 2000 |
0 |
+20 |
| > 2000 < 3000 |
0 |
+25 |
| > 3000 |
0 |
+30 |
Width shall be measured perpendicular to the major axis of the plate.
Plates may be supplied with untrimmed edges, condition NK. In this case, width tolerances shall be agreed at the time of the enquiry and order.
Length tolerance
| Nominal length |
Tolerances |
| Lower |
Upper |
| < 4000 |
0 |
+ 20 |
| >4000 < 6000 |
0 |
+ 30 |
| >6000 < 8000 |
0 |
+ 40 |
| >8000 < 10000 |
0 |
+ 50 |
| >10000 < 15000 |
0 |
+ 75 |
| >15000 < 200001) |
0 |
+100 |
- Tolerances on plates with a nominal length > 20000mm shall be agreed at the time of the enquiry/order.
The length of the plate is the length of the largest rectangle contained within a plate.
Edge camber and out of squareness
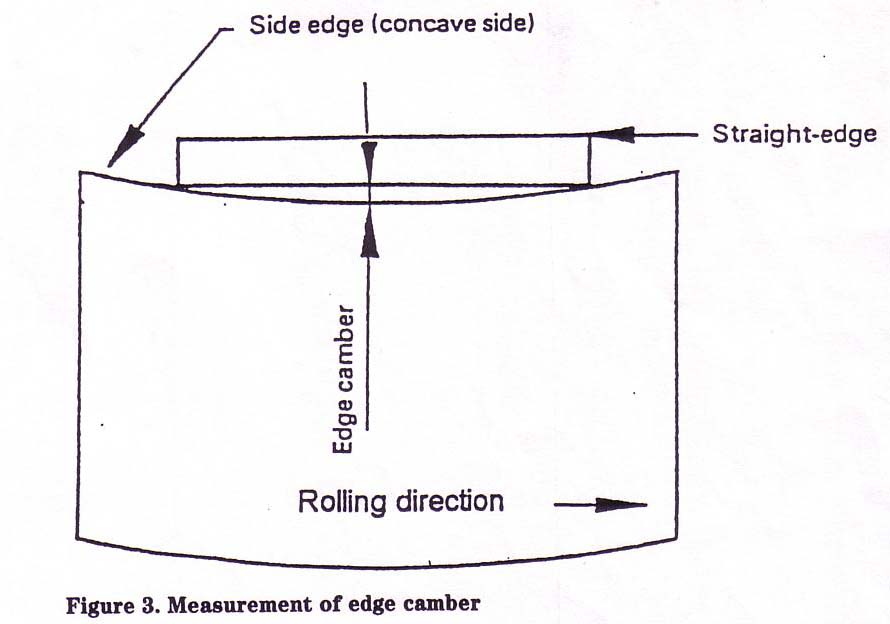
Edge camber is the maximum deviation between one longitudinal edge and the straight line joining the two ends of this edge.

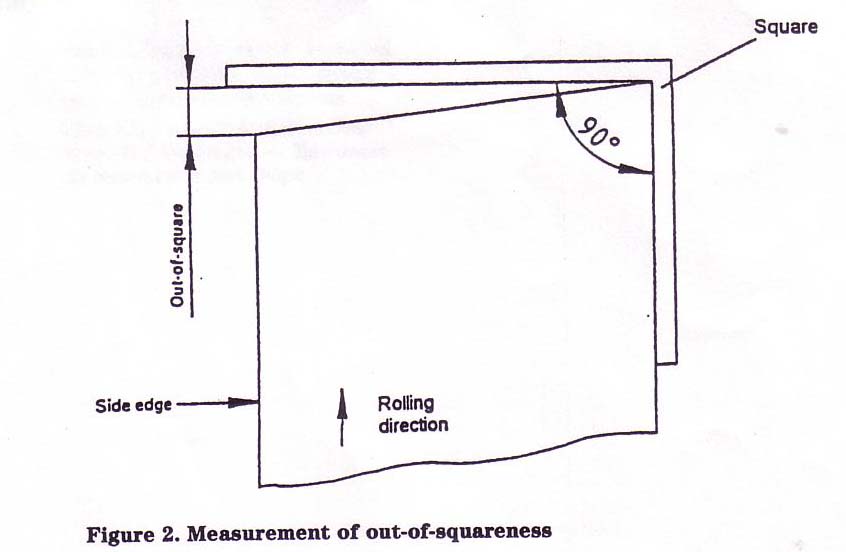
The out of squareness is the orthogonal projection of one transverse edge on one longitudinal edge.

The edge camber and out of squareness of a plate shall be limited so that it shall be possible to inscribe a rectangle with the dimensions of the ordered plate within the delivered size.
Additionally, if agreed at the time of the enquiry and order, edge camber shall be limited to 0.2% of the actual length of the plate and out of squareness to 1% of the actual width of the plate. This extra requirement is designated G.
Flatness tolerance
Flatness shall be measured as follows:
Place plate on a flat surface. Deviation from flatness shall be determined by measuring the deviation in distance between the plates and a straight edge of 1000mm or 2000mm long which may be placed in any direction.
Only the part between two points of contact between the straight edge and the plate shall be taken into consideration. Deviations shall be measured at a point at least 25mm from the longitudinal edges and at a distance of 200mm from the end for Normal tolerances or 100mm for Special tolerances
Flatness tolerances are either Normal, Class N, or Special, Class S. The tolerance also depends on the minimum yield strength of the steel. These are steel types L and H:
L - Products with a specified minumum yield strength < 460 N/mm2, neither quenched nor quenched and tempered.
H - Products with specified minumum yield strength > 460 N/mm2 and < 760 N/mm2 and all grades of quenched and quenched and tempered products
Note. Not in standard itself. For stainless steel the yield strength should be taken as the 0.2% PS from the material standard EN 10088-2 or EN 10028-7. The quenching which is often part of the heat treatment after solution annealing of austenitic stainless steel is NOT intended in these definitions. Most austenitic stainless steel will therefore fall into class L.
Normal flatness tolerances Class N
| Nominal thickness |
Steel type L |
Steel type H |
| Measuring length |
| 1000 |
2000 |
1000 |
2000 |
| > 3 < 5 |
9 |
14 |
12 |
17 |
| > 5 < 8 |
8 |
12 |
11 |
15 |
| > 8 < 15 |
7 |
11 |
10 |
14 |
| > 15 < 25 |
7 |
10 |
10 |
13 |
| > 25 < 40 |
6 |
9 |
9 |
12 |
| > 40 < 250 |
5 |
8 |
8 |
11 |
If the distance between the points of contact of the straight edge and the plate < 1000mm the permissible deviation from flatness shall comply with the following requirements:
For steel type L a maximum of 1% and for steel type H a maximum of 1.5% of the distance between points of contact on the plate between 300 and 1000mm but not exceeding the values in the above table.
Special flatness tolerances, Class S
| Nominal thickness |
Steel type L |
Steel type H |
| Plate width |
| < 2750 |
> 2750 |
| Measuring length |
| 1000 |
2000 |
1000 |
2000 |
1000 |
2000 |
| > 3 < 8 |
4 |
8 |
5 |
10 |
Shall be agreed at time of enquiry and order |
| > 8 < 250 |
3 |
6 |
3 |
6 |
Tighter tolerances for steel type L can be agreed at the time of enquiry and order.
If the distance between the points of contact of the straight edge and the plate < 1000mm the permissible deviation from flatness shall comply with the following requirements:
A maximum of 0.5% of the distance between points of contact but not exceeding the values in the above table and not < 2mm.
Excess mass
There is a rather complex table for excess mass and it is not intended to reproduce it in this article. Unless otherwise agreed at the time of the enquiry and order, excess mass shall not be a cause for rejection.
Related References:
1. British Standard BS for Stainless Steel for General Application
2. British Standard for Welding and Fabrication of Stainless Steel
3. BS ASTM Tolerances Surface Finish and Test of Stainless Steel
4. British EN Standard Strength of Steel
5. BS Pipe Tube and Fitting Standard and Specification
6. BS ASTM Tolerances Surface Finish and Test of Stainless Steel
7. EN ASTM Stainless Steel for Pressure Vessel Application
8. EN European Standard for Stainless Steel
9. European EN Standard Grade Summary
10. European Dimensional Tolerance Standard for Stainless Steel
|
